Paystack Payment Integration in Flutter App
Payment integration in flutter app using paystack
Table of contents
No headings in the article.
In this article, we'll be looking at card payment integration using Paystack package called flutter_paystack
Paystack is a Modern online and offline payments for Africa
Paystack helps businesses in Africa get paid by anyone, anywhere in the world
Head over to Paystack Login to access the dashboard.
If you don't have an account you can create an account here
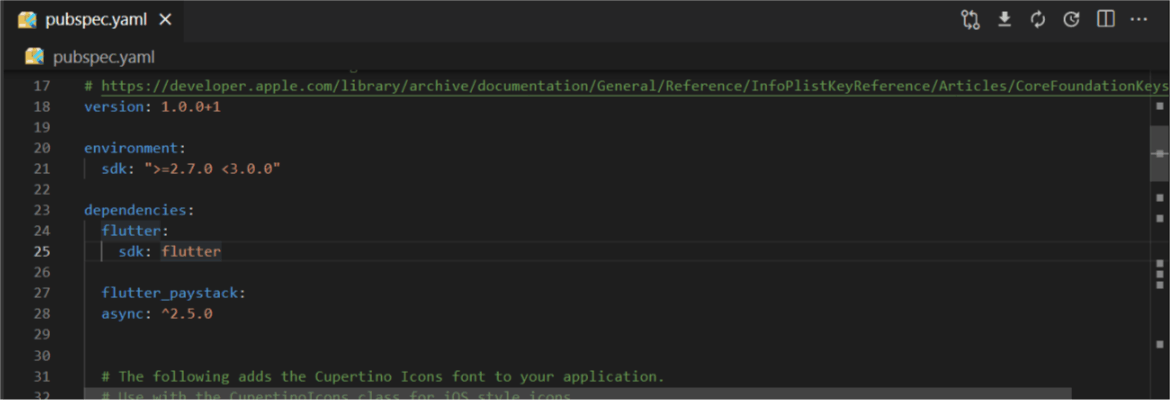
In your flutter project head over to pubspec.yaml and require the following packages
flutter_paystack:
async: ^2.5.0
Please ensure it's properly aligned as shown in the image
Run
flutter pub get
Head over to Paystack settings page and click on API keys & Webhook to get the public key for testing
https://dashboard.paystack.com/#/settings/profile
For the purpose of having a clean code the PayButton widget is in button.dart' under the widgets folder and imported at the top of the main.dart file.
Here's is the code for the PayButton widget
import 'dart:ui';

import 'package:flutter/cupertino.dart';
import 'package:flutter/material.dart';

class PayButton extends StatelessWidget {
  const PayButton({this.callback});

  final VoidCallback callback;

  @override
  Widget build(BuildContext context) {
    return GestureDetector(
      child: Container(
        width: MediaQuery.of(context).size.width,
        height: 45,
        child: ButtonTheme(
          minWidth: MediaQuery.of(context).size.width,
          child: ElevatedButton(
            style: ElevatedButton.styleFrom(
              padding: const EdgeInsets.all(10),
              primary: Colors.blueAccent,
              elevation: 5,
              shape: RoundedRectangleBorder(
                  borderRadius: BorderRadius.circular(16.0)),
            ),
            onPressed: callback,
            child: Row(
              mainAxisAlignment: MainAxisAlignment.center,
              children: <Widget>[
                Text(
                  'Pay Now!!!',
                  style: TextStyle(
                      fontSize: 16,
                      fontWeight: FontWeight.bold,
                      color: Colors.white),
                ),
              ],
            ),
          ),
        ),
      ),
    );
  }
}
Here's the link to the PayButton widget file
Next go to main.dart file and add the snippet
Kindly note that the whole code was done in a page feel free to customize it according to your project approach (cubit, bloc, services, etc..)
import 'dart:io';

import 'package:flutter/material.dart';
import 'package:flutter_paystack/flutter_paystack.dart';
//PayButton widget import below
import 'package:flutter_paystack_integration/widgets/button.dart';

void main() => runApp(MyApp());

class MyApp extends StatelessWidget {
  @override
  Widget build(BuildContext context) {
    return MaterialApp(home: PaystackCardMethod());
  }
}

class PaystackCardMethod extends StatefulWidget {
  @override
  _PaystackCardMethodState createState() => _PaystackCardMethodState();
}

class _PaystackCardMethodState extends State<PaystackCardMethod> {
  String publicKeyTest =
      'pk_test_ieu49ej839u984urenewuwe06eishra'; //pass in the public test key obtained from paystack dashboard here

  final plugin = PaystackPlugin();

  @override
  void initState() {
    //initialize the publicKey
    plugin.initialize(publicKey: publicKeyTest);
    super.initState();
  }

  //a method to show the message
  void _showMessage(String message) {
    final snackBar = SnackBar(content: Text(message));
    ScaffoldMessenger.of(context).showSnackBar(snackBar);
  }

  //used to generate a unique reference for payment
  String _getReference() {
    var platform = (Platform.isIOS) ? 'iOS' : 'Android';
    final thisDate = DateTime.now().millisecondsSinceEpoch;
    return 'ChargedFrom${platform}_$thisDate';
  }

  //async method to charge users card and return a response
  chargeCard() async {
    var charge = Charge()
      ..amount = 10000 *
          100 //the money should be in kobo hence the need to multiply the value by 100
      ..reference = _getReference()
      ..putCustomField('custom_id',
          '846gey6w') //to pass extra parameters to be retrieved on the response from Paystack
      ..email = 'tutorial@email.com';

    CheckoutResponse response = await plugin.checkout(
      context,
      method: CheckoutMethod.card,
      charge: charge,
    );

    //check if the response is true or not
    if (response.status == true) {
      //you can send some data from the response to an API or use webhook to record the payment on a database
      _showMessage('Payment was successful!!!');
    } else {
      //the payment wasn't successsful or the user cancelled the payment
      _showMessage('Payment Failed!!!');
    }
  }

  @override
  Widget build(BuildContext context) {
    return Scaffold(
      appBar: AppBar(
        title: Text(
          "Paystack Integration",
        ),
        centerTitle: true,
        elevation: 0.0,
      ),
      body: Container(
          padding: EdgeInsets.all(10),
          child: Center(
            child: Container(
              margin: const EdgeInsets.symmetric(horizontal: 24, vertical: 12),
              padding: const EdgeInsets.all(15),
//PayButton widget is imported at the top of this file
              child: PayButton(
                //call the chargeCard method
                callback: () => chargeCard(),
              ),
            ),
          )),
    );
  }
}
Next
flutter run
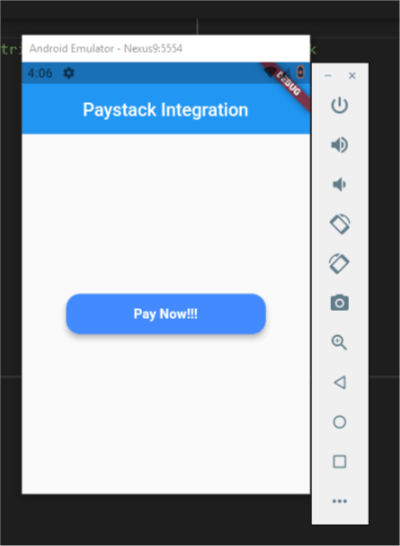
Click the pay now button
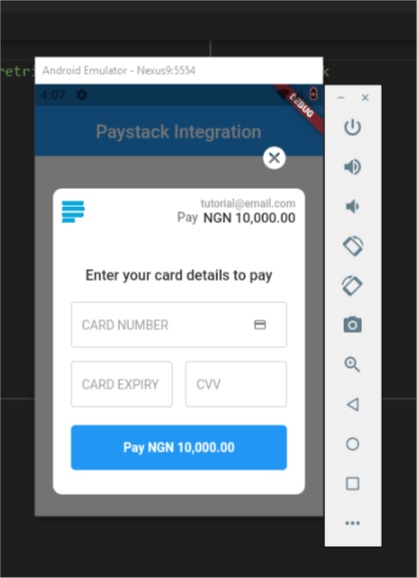
Card details for testing payments
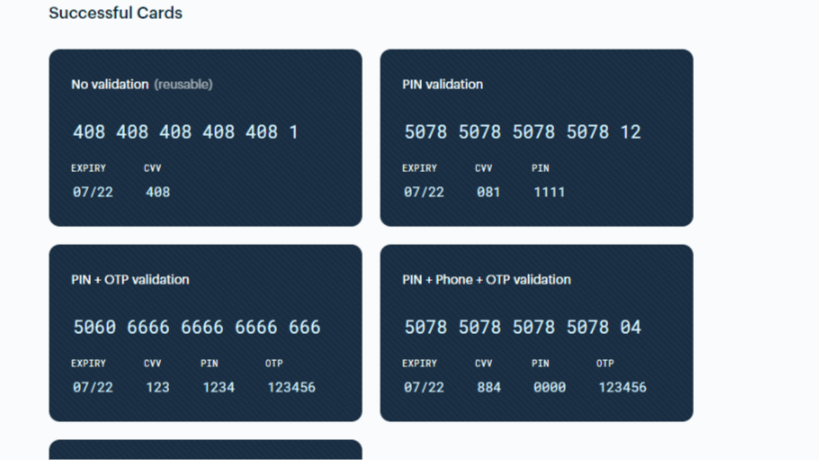
More card details for testing can be found here
Snackbar message when the payment is canceled
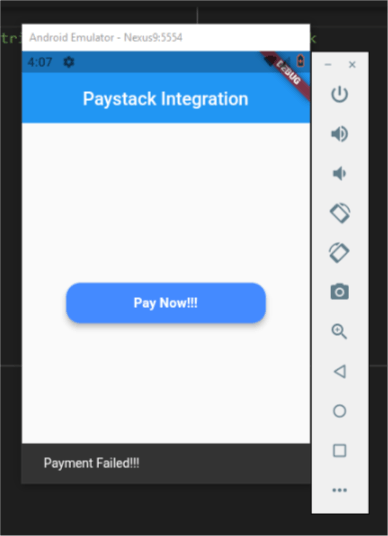
Here's the link to this tutorial's repository
** Article research credits **
Please kindly share with your network and feel free to use the comment section for questions, answers, and contributions.
