Laravel 9: Building a blog application with Bootstrap 5
Exploring the features of Laravel 9 by building a blog application using bootstrap 5

I’m a Software Engineer with over 5+ years of experience in Technology with a track record in building web applications, mobile applications and Technical Writing. Readily available to explore innovations in ICT and creatively use them to build solutions. Advancing my career in software engineering and contributing to the growth of tech communities around the world. I’m also passionate about working with organizations especially tech, security experts and airline industries to learn and also make contributions that will be a legacy.
Tech is Easy to Learn - https://amazon.com/dp/B0B8T838K
In this article, we'll use Laravel 9 to build a blog application (create, read, update and delete) with bootstrap 5.
The Laravel 9 was released on the 8th of February 2022 by the awesome Laravel team led by Taylor Otwell with minimum support for PHP 8.0 - 8.1.
Laravel 9 continues the improvements made in Laravel 8.x by introducing
support for Symfony 6.0 components, Symfony Mailer, Flysystem 3.0,
improved route:list output
a Laravel Scout database driver
new Eloquent accessor/mutator syntax
implicit route bindings via Enums, and a variety of other bug fixes and usability improvementssource
In a bit to get on board with some of the features in Laravel 9, we'll be building a simple blog application.
Let's start with a fresh laravel 9 app installation
laravel new laravel9_blog_application
OR
composer create-project laravel/laravel9_blog_application

After successful installation change the directory to laravel9_blog_application
cd laravel9_blog_application
--Run
php artisan --version

Yoo!!! Laravel 9 app created
php artisan serve

Awesome

**Use the version constraint such as ^9.0 in referencing the laravel framework or components since major releases do include breaking changes. **
Next, let's set the environment variable for this blog application on the .env file
DB_CONNECTION=mysql
DB_HOST=127.0.0.1
DB_PORT=3306
DB_DATABASE=laravel9_blog_application
DB_USERNAME=root
DB_PASSWORD=
Before we run migrate let's look at one of the new features in laravel 9
Anonymous Stub Migrations
The Laravel team released Laravel 8.37 with anonymous migration support, which solves a GitHub issue with migration class name collisions. The core of the problem is that if multiple migrations have the same class name, it'll cause issues when trying to recreate the database from scratch.
As you may have noticed in the example below, Laravel will automatically assign a class name to the migration that you generate using the make:migration command. However, if you wish, you may return an anonymous class from your migration file. This is primarily useful if your application accumulates many migrations and two of them have a class name collision:
The stub migration feature eliminates migration class name collisions when you run php artisan make:migration
<?php

use Illuminate\Database\Migrations\Migration;
use Illuminate\Database\Schema\Blueprint;
use Illuminate\Support\Facades\Schema;

return new class extends Migration
{
    /**
     * Run the migrations.
     *
     * @return void
     */
    public function up()
    {}

    /**
     * Reverse the migrations.
     *
     * @return void
     */
    public function down(){ }
};
Next, run the migrate command
php artisan migrate

Install npm and Bootstrap 5 dependencies using the npm command below
npm install

npm install --save bootstrap jquery popper.js cross-env

Import packages in the resources/js/bootstrap.js file
try {
    window.Popper = require('popper.js').default;
    window.$ = window.jQuery = require('jquery');

    require('bootstrap');
} catch (e) {
}
Rename the css folder in the resource folder to sass
Import packages in the resources/sass/app.scss file
// bootstrap
@import "~bootstrap/scss/bootstrap";

Open the webpack.mix.js and update it
 mix.js('resources/js/app.js', 'public/js')
 .sass('resources/sass/app.scss', 'public/css');
Next, compile the installed assets
npm run dev
Kindly note: if this error occurs
ERROR in ./node_modules/bootstrap/dist/js/bootstrap.esm.js 6:0-41 Module not found: Error: Can't resolve '@popperjs/core' in
Run the command below and recompile
npm i @popperjs/core --save

Next, we'll add a basic authentication feature (Login and register) using laravel fortify.
The process for setting it up in Laravel 9 is the same as this article I published last year on Complete Laravel 8 Authentication Using Laravel Fortify and Bootstrap 4.
In this article, we'll stop at adding the auth views and setting up the register, verify and login logic only. You can get sample auth views from this repo or use your bootstrap custom snippets in each file as desired.
Here's a screenshot of the login and register pages
- Login page

- Register

Improved Ignition Exception Page in Laravel 9
Ignition is developed by Spatie.
Ignition, the open-source exception debug page created by Spatie, has been redesigned from the ground up. The new, improved Ignition ships with Laravel 9.x and includes light / dark themes, customizable "open in editor" functionality, and more.
Here's an example of an exception page

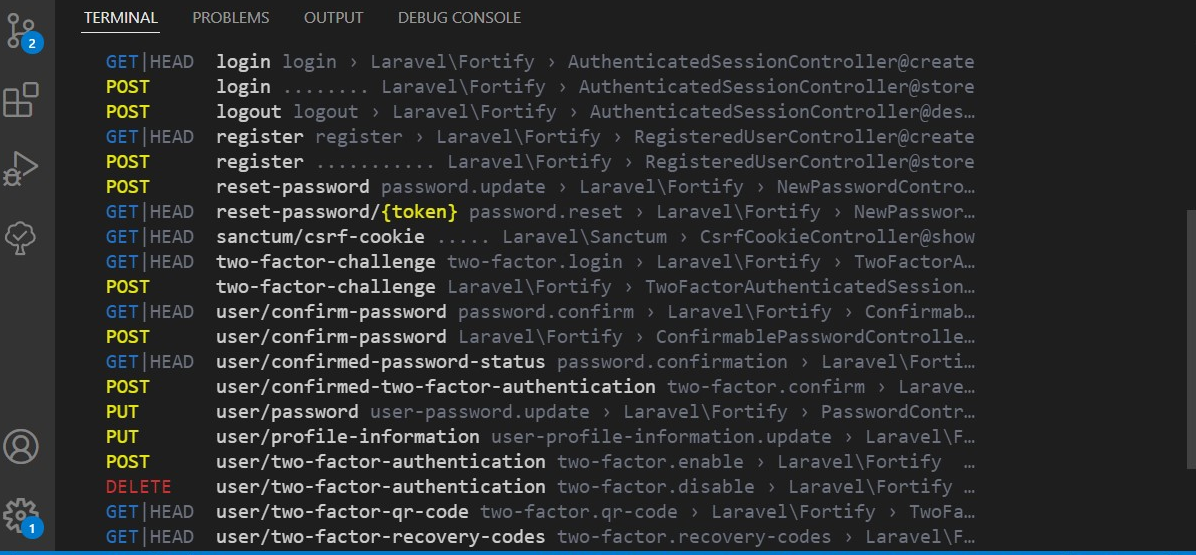
Improved route:list CLI Output in Laravel 9
Improved route:list CLI output was contributed by Nuno Maduro.
The route:list CLI output has been significantly improved for the Laravel 9.x release, offering a beautiful new experience when exploring your route definitions.
Symfony Mailer support was contributed by Dries Vints, James Brooks, and Julius Kiekbusch.
In Laravel 9 Swift Mailer is no longer maintained and has been succeeded by Symfony mailer.
For testing purposes, you can create an account on mailtrap.io and configure the mail settings on the .env file
MAIL_DRIVER=smtp
MAIL_HOST=smtp.mailtrap.io
MAIL_PORT=2525
MAIL_USERNAME=
MAIL_PASSWORD=
MAIL_ENCRYPTION=tls
MAIL_FROM_ADDRESS="your@gmail.com"
MAIL_FROM_NAME="${APP_NAME}"
Next refresh the browser. Register as a user. Check the mailtrap inbox to see the mail for verifying the email.
Awesome!!! Everything works fine even with the new Swift Mailer


If you want to go further in using the other features of Fortify kindly check out this article
Next, let's create a posts table to keep a record of posts for our blog
We'll use a free blog template from startbootstrap for some of the posts pages
php artisan make:migration create_posts_table --create=posts
Add the following columns
            $table->foreignId('user_id');
            $table->string('title');
            $table->text('description');

php artisan migrate

Next, let's create the posts folder and the index, show, create and edit blade file. The home view will be used to list all the posts.

Next, we'll create a resource controller and model for Posts named PostController.
php artisan make:controller PostController --resource --model=Post

Here's the PostController. We have an additional method called all_posts to display all posts
<?php

namespace App\Http\Controllers;

use App\Models\Post;
use Illuminate\Http\Request;
use Illuminate\Support\Facades\Auth;

class PostController extends Controller
{
    /**
     * Display a listing of the resource.
     *
     * @return \Illuminate\Http\Response
     */
    public function index()
    {
        $posts = Post::where('user_id', Auth::user()->id)->latest()->get();

        return view('posts.index', compact('posts'));
    }

    /**
     * Show the form for creating a new resource.
     *
     * @return \Illuminate\Http\Response
     */
    public function create()
    {
        return view('posts.create');
    }

    /**
     * Store a newly created resource in storage.
     *
     * @param  \Illuminate\Http\Request  $request
     * @return \Illuminate\Http\Response
     */
    public function store(Request $request)
    {
        $request->validate([
            'title' => 'required|string|max:255',
            'description' => 'required|string',
        ]);

        $post = new Post($request->all());
        $user = Auth::user();

        $user->posts()->save($post);

        return redirect()->route('posts.create')
                        ->with('success','Post created successfully.');
    }

    /**
     * Display the specified resource.
     *
     * @param  \App\Models\Post  $post
     * @return \Illuminate\Http\Response
     */
    public function show(Post $post)
    {
        return view('posts.show',compact('post'));
    }

    /**
     * Show the form for editing the specified resource.
     *
     * @param  \App\Models\Post  $post
     * @return \Illuminate\Http\Response
     */
    public function edit(Post $post)
    {
        return view('posts.edit', compact('post'));
    }

    /**
     * Update the specified resource in storage.
     *
     * @param  \Illuminate\Http\Request  $request
     * @param  \App\Models\Post  $post
     * @return \Illuminate\Http\Response
     */
    public function update(Request $request, Post $post)
    {
        $request->validate([
            'title' => 'required|string|max:255',
            'description' => 'required|string',
        ]);

        $post->update($request->all());

        return redirect()->route('posts.index')
                        ->with('success','Post updated successfully');
    }

    /**
     * Remove the specified resource from storage.
     *
     * @param  \App\Models\Post  $post
     * @return \Illuminate\Http\Response
     */
    public function destroy(Post $post)
    {
        $post->delete();

        return redirect()->route('posts.index')
                        ->with('success','Post deleted!!!');
    }


    public function all_posts()
    {
        $posts = Post::latest()->get();
        return view('home', compact('posts'));
    }
}
Post Model
<?php

namespace App\Models;

use Illuminate\Database\Eloquent\Factories\HasFactory;
use Illuminate\Database\Eloquent\Model;
use Illuminate\Database\Eloquent\Casts\Attribute;


class Post extends Model
{
    use HasFactory;

    protected $fillable = [
        'title', 'description'
    ];


//relationship to retrieve the user associated with a post
    public function user()
    {
        return $this->belongsTo(User::class);
    }


//new laravel 9  single non-prefix method
    public function created_at(): Attribute
    {
        return new Attribute(
            get: fn ($value) => $value->diffForHumans(),
            // set: fn ($value) => $value,
        );
    }
}
In Laravel 9.x you may define an accessor and mutator using a single, non-prefixed method by type-hinting a return type of Illuminate\Database\Eloquent\Casts\Attribute:
use Illuminate\Database\Eloquent\Casts\Attribute;
   //let's format the created_at timestamp to be readable by readers

    public function created_at(): Attribute
    {
        return new Attribute(
            get: fn ($value) => $value->diffForHumans(),
            //set: fn ($value) => $value, you can also set the value when creating the record
        );
    }

let's update the user model to associate posts to the author(user)
    public function posts()
    {
        return $this->hasMany(Post::class);
    }
Route setup on web.php
Laravel 9 Controller Route Groups
In Laravel 9, you may now use the controller method to define the common controller for all of the routes within the group. Then, when defining the routes, you only need to provide the controller method that they invoke:
<?php

use Illuminate\Support\Facades\Route;
use App\Http\Controllers\PostController;


//Controller Route Groups
Route::controller(PostController::class)->group(function () {
    Route::get('/', 'all_posts');
    Route::get('/all/posts', 'all_posts')->name('home');
});

Route::middleware(['auth', 'verified'])->group(function () {
    Route::resource('posts', PostController::class);
});
Post pages (index, create, edit, show), Including form validations, Including the home & welcome page views are available on this tutorial repository
The tutorial repository contains the views.
Welcome Page

Add post

User's blog posts

Show post details

If logged in user is the author show edit and delete

In real-world applications ensure to make use of the soft delete for a delete action and also confirm the action from the user just in a case of unintended click.
Support for String Functions in PHP 8
The most recent string functions str_contains(), str_starts_with(), and str_ends_with() internally in the IlluminateSupportStr class are incorporated for use in laravel 9.
You got to this point awesome!!! Congratulations!!! You can now build an app of your choice using laravel 9 with bootstrap 5.
Conclusion
In this article, we've covered some new features introduced in Laravel 9. Worthy of note is that there's no difficulty in migrating to Laravel 9 from previous Laravel versions.
Find this helpful or resourceful?? kindly share and feel free to use the comment section for questions, answers, and contributions.


